
We’ll be working in the ‘My Site Info’ page found in your dashboard. On this page you’ll see other settings where you can add other business information however, this article will be focusing on how you can add your own logo to your website.
To learn more about what these other settings do and how you can properly utilize them, please read this article.
In order to to add your own logo to your website, click the menu item called “My Site Info”. It should be near the top of the left menu.
This will take you to the settings page where you can set up your business information that will appear on your website.

On the bottom right, you will see a section where you can upload your logo. (See picture above)
There is a placeholder logo there, you can change it to your logo on this screen.
Before uploading it, make sure it’s formatted properly for use on a website. Often when you get a logo designed, it will be really large, or it might have a lot of blank space around it that won’t look right when you upload it.
To upload your logo, click the “Upload new logo” button. This will usually open the media library, which shows files that have already been uploaded to your site. But you’ll want to upload a new one, so click the tab “Upload Files”. Now you can select a file on your computer or you can drag and drop it into the area on the screen to upload it.
If your image is too large, or if it has extra space around your logo, click below.
If your logo is too big or has extra space around it, CLICK HERE
f your logo is too large or has extra space around it
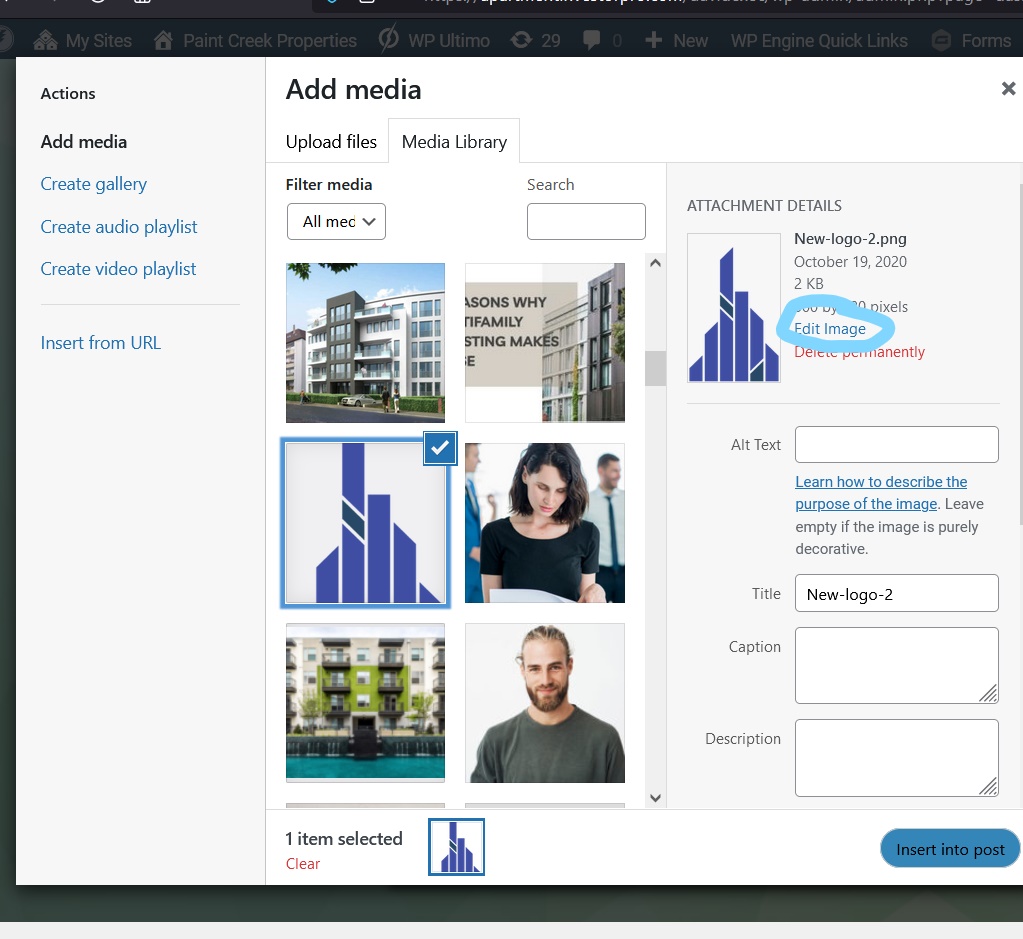
If the logo is large or has extra space around it, you may need to edit it. To do that, near the top of the screen after you uploaded your image you should see a link called “Edit Image”. Click that.
The measurement will show your logo’s size in pixels. Just for reference, a really wide laptop screen might be 1600 pixels wide, so a logo bigger than that wouldn’t even fit on most screens, and wouldn’t be a good size for a logo on your site.
If you see a checkberboard pattern behind a logo, that means the background is transparent, which is good, it won’t have a box around it a different color than your header. However if there is too much space around your logo, it may look too small on the header. You can solve this by cropping your logo.
Make sure “crop” is selected in the tabs at the top, and then click and drag a box around the area you want to keep. Like this:
 You’ll want to crop out most of the blank space around the logo.
If you also need to resize your image, enter the new dimensions you want in the new dimensions boxes. The second number is the height. Usually about 200 is more than enough.
You’ll notice when you change one of the numbers, the other automatically changes. That way you’re not stretching out your image, but it will still look right.
After you have it the size you want, click the Scale button.
When you’re finished, click the Back button at the bottom of the screen.
On the next screen, click the “Insert Into Post” button in the bottom right.
On the next screen, click “Save Settings”
If everything is OK with your logo, click the “Insert Into Post” button in the bottom right.
After making any needed changes, click the Save Settings button.
Now you’ll probably want to check your site and make sure everything looks correct, if it does then you are all set!